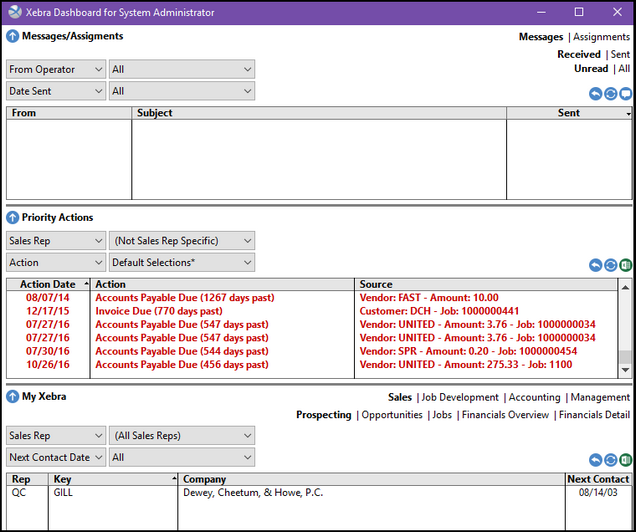
The Dashboard is an interactive tool that includes an internal messaging system, priority actions, and department-specific information to streamline your daily activities within Xebra. It is an independent screen that you can keep open while you are working in any part of the Xebra system. This screen can also be re-sized to fit your needs by clicking on any of the sides or corners and dragging them outward. Each section, Messages/Assignments, Priority Actions, and My Xebra, can be collapsed or expanded by clicking on the blue and white arrow buttons on the left-hand side of the screen. You can also adjust the size of each section by clicking and dragging the thick, gray lines that separate each section.
Messages:

Users have the ability to view 'Received' or 'Sent' messages. You can also choose if you want to see just 'Unread' messages or if you want to see 'All' messages. Each column can be sorted in ascending or descending or by clicking on the column headers.
Composing a New Message - Click on the New Message button in the top-right corner of the screen (shown in the above screenshot in the red box).
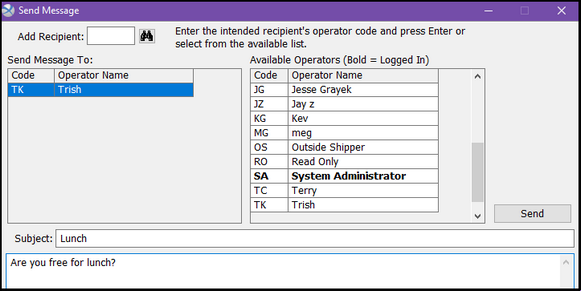
| ◆ | Add Recipient - Enter an operator code to add the operator to the list of recipients, or double-click an entry from the Available Operators list on the right. |
| ◆ | Subject - Enter a Subject for this message. This will be shown when the operator receives the message. |
| ◆ | Message Body - An open, general text field used to compose the message. |
| ◆ | Click on the Send button on the right-hand side of the screen. After you send the message, you will be directed back to the main Dashboard screen. You can view your 'Sent' messages to verify that your message was sent. |
Receiving New Messages - You will notice a blue flashing ball in your Desktop's Taskbar when a new message has been sent to you. When you click on it, a dialog box will open, stating that you have received a new operator message. Click OK. When you are ready to view your message, go to the Dashboard, and click on 'Received' in the Messages section. After reading the message, you can either Reply, Forward, or Delete it. NOTE: Messages CANNOT be retrieved once they have been deleted.
Assignments:

Users have the ability to view 'Received' or 'Assigned' assignments. You can also choose if you want to see All, Open, Unread, Past Due, or Complete assignments. Each column can be sorted in ascending or descending or by clicking on the column headers. For more information, please see the Assignments section of the Order Entry I chapter.
| • | Priority Actions - The purpose of Priority Actions is to keep track of all actions that are either due today or past due. |

NOTE: Your Xebra Operator settings (operator type, sales rep restrictions, and security settings) directly affect what you can and cannot see.
Select an action from the Default Selections* drop-down, and the results of your selection will appear.
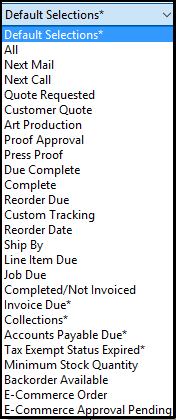

In this example, the list will show you all jobs that have a status of 'Completed' but have not been invoiced as of today's date. If you double-click on any of the items in the list, that job will automatically load on your Order Entry screen. You can keep both screens open, side-by-side, and work through your list. At any time, you can click on the 'Refresh' button, and the items that have been resolved will be removed from the list. You may also export your list into an Excel spreadsheet by clicking on the 'Excel' button.
The action selected from the drop-down dictates which Xebra screen will open when you double-click on an item in the list. For example, if you select 'Next Call' or 'Next Mail', the associated Prospecting record will load in the Prospecting screen. If you select 'Accounts Payable Due', the AP Entry screen will open. In other words, when you double-click on a result in your list, based on the action you selected, you will be taken to the screen most relevant for resolving that item.
NOTE: Your Xebra Operator settings (operator type, sales rep restrictions, and security settings) directly affect what you can and cannot see.
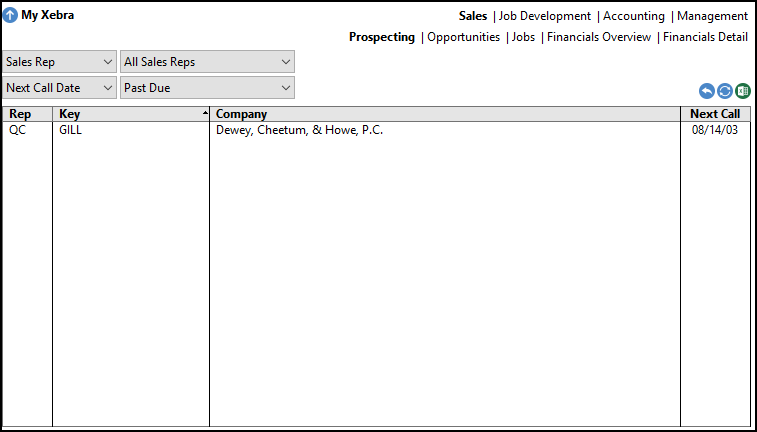
| ◆ | Sales - Each section listed below can be narrowed down to a specific sales rep, or you can select 'All Sales Reps'. You can also click on the Excel button to turn the information into an Excel spreadsheet. |

| ▪ | Prospecting - This selection is driven by the Next Call Date. It will show you all prospecting records with Next Call Dates that are past due, due today, due in the next 30 days, 60 days, 90 days, 180 days, or you can enter a date range. |
| ▪ | Opportunities - This selection is driven by the Reorder Date. It will show you all jobs with Reorder Dates that are past due, due today, due in the next 30 days, 60 days, 90 days, 180 days, or you can enter a date range. |
| ▪ | Jobs - This selection is driven by the Job Status, and will give you the status, date ordered, due date, invoiced date, and paid date for every job that fits the selected criteria. |
| ▪ | Financials Overview - This section will give you a year-to-date comparison of your sales and margins for the current year and the previous year.You will also see your totals for Open Jobs and Invoiced Jobs for the current year. There is a graph at the bottom that will show you the year-to-date sales comparison as well. |
| ▪ | Financials Detail - This selection is driven by the Job Status, and will give you the Sales, Margin, and Margin % for each job that fits your criteria. |
| ◆ | Job Development - This selection will help you keep your jobs organized and to keep track of what actions need to be taken in order to move your jobs to completion. You can turn this information into an Excel spreadsheet by clicking on the Excel button. |

| ▪ | This selection will give you results based on the Sales Rep and Job Status selections you choose. |
| ▪ | At this time, the Sales Rep and Job Status drop-downs you see on the left (screenshot above) are not active and cannot be changed. These options will become available in future system updates. |
| ▪ | The drop-downs to the right that say 'All Sales Reps' and 'Open Jobs' are active lists. You can view jobs based on all sales reps, or you can view jobs for a specific sales rep. You can also view jobs of all statuses, or you can view jobs with a specific job status. |

| ▪ | You can see All, Open, Unread, Past Due, Complete, or Deleted assignments. |
| ▪ | This selection will give you results based on the From Operator, To Operator, and the Assigned/Due/Read selections you choose. |
| ▪ | At this time, the From Operator and To Operator drop-downs you see on the left (screenshot above) are not active and cannot be changed. These options will become available in future system updates. |
| ▪ | The drop-downs to the right that say 'All' are active lists. You can view assignments based on all From Operators, or you can view assignments for a specific From Operator. This is also true for the To Operator. You can also select a time frame (today, last 30 days, last 60 days, date range, etc.). |
| ◆ | Accounting - This selection will help you keep your accounting tasks in order. You can turn this information into an Excel spreadsheet by clicking on the Excel button. |

| ▪ | Receivables - Tracks all money that is due to come in to your company. |
| o | Collections - Keeps track of customers with past due balances. The screen will show you the amount they are past due, the total due (includes current balances), and when their last payment was made. Double-clicking on an item will take you directly to the Collections screen where you can perform any necessary tasks, add a History note, reset your follow-up date, etc. You can also click on the word 'Collections' in blue to go to the Collections screen (bottom-right of the above-screenshot). |
| o | All Receivables - This is a detailed list of all money owed to you, which is broken down by each individual invoice. Double-clicking on an item in this list will load the job on your Order Entry screen. You can also narrow this down to a specific Customer Billing code. Enter the code in the BILL CODE field and hit Tab or Enter on your keyboard, or you can click on the magnifying glass to search for a Customer Billing code. To go directly to the Cash Receipts screen, click on the words 'Cash Receipts' in blue (bottom-right of the screenshot below). |

| ▪ | Payables - Tracks all out-going money for your company (includes job-related and non-job-related payables). This is a detailed list all payables that have been entered into your system.You can also narrow this down to a specific Vendor Remittance code. Enter the code in the VENDOR CODE field and hit Tab or Enter on your keyboard, or you can click on the magnifying glass to search for a Vendor Remittance code. Double-clicking on an item will take you directly to the Accounts Payable Entry screen. To go directly to the AP Disbursement screen, click on the words 'AP Disbursement' in blue (bottom-right of the screenshot below). |

| ◆ | Management - This is a snap-shot of your company as a whole. |
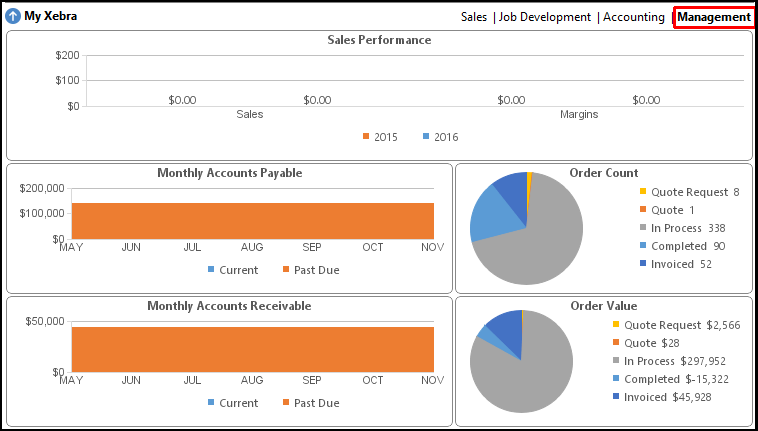
NOTE: Your Xebra Operator settings (operator type, sales rep restrictions, and security settings) directly affect what you can and cannot see.