It is not uncommon to require inventory adjustments after completing a physical inventory count.
The Post Physical Inventory action is used to adjust existing inventory levels. This function is only used to lessen the available quantity. This is done from the perspective of the quantity that exists in the warehouse and is available for release. To adjust based on the units that need to be removed, rather than what is available, use the Usage function.
To begin, from Customer Specific Inventory, select Actions > Post Physical Inventory
Enter the location in which you wish to adjust inventory. In most cases, this will be a warehouse location.

Once the location has been selected, you will be prompted to confirm or edit the Inventory Date. This will default to the current date.

The list box will show all active inventory items for the location selected. For each item, the current available Cartons and Quantities are shown.
To adjust, double-click the item.

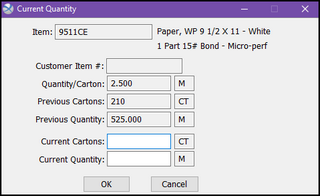
The Current Quantity screen shows the following static fields:
| • | Item – The Item Code selected |
| • | Customer Item # - If applicable, the Customer Item Number associated with the selected item. |
| • | Quantity/Carton – Based on packing information and inventory receipt activity. |
| • | Previous Cartons – The inventory balance, in cartons, prior to your current adjustment. |
| • | Previous Quantity – The inventory balance, in the inventory UOM, prior to your current adjustment. |
The following active fields will be used for your adjustment:
| • | Current Cartons – Enter the number of cartons that are available in inventory based on your physical count. |
OR
| • | Used Quantity – Enter the UOM quantity that is available in inventory based on your physical count. |
Note: You will enter only one of these. Based on the Quantity/Carton, Xebra will calculate the other automatically.
Select OK.

Notice the item you have adjusted has now been grayed out and italicized, showing that the adjustment has been recorded. The Cartons and Quantity have also been updated to reflect your adjustment.
Note: You may make multiple adjustments if necessary to the same item, but you cannot undo previous adjustments from here. To reverse an adjustment, from the Item Control Record in question, access View > Activity and Void the related activity entry.
When you have adjusted all items, select Close.