This catalog type provides more of an online “order form” format. It lists all included products and info on a single screen, allowing the end user to enter order quantities for multiple items and add them all to the cart at once. This is more of a utilitarian format and can be used for those end users that place orders or release requests for multiple products at the same time on a regular basis. The biggest restriction to using Product Specific Catalogs is that they are product specific, meaning you cannot mix Warehouse Release, Stock Sales, and Stationery items in the same catalog. To begin creating a Product Specific Catalog, select User located below Master in the Warehouse Release, Stock Sales, or Stationery sections.

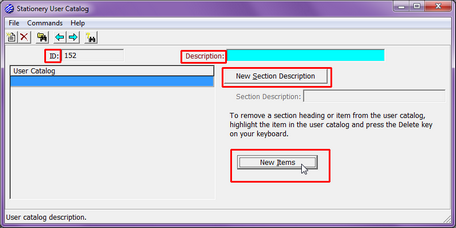
The User Catalog dialog provides you the ability to create and manage catalogs. Typical functions are available such as Create New, Find, Next, and Previous. To begin, select New.

| • | ID – Every catalog is assigned an internal identification number by Xebra. This is used for administration purposes only and will have no bearing on your end users. It is usually a good idea to make note of this ID for later use. |
| • | Description – 30 characters are provided for you to give the catalog a description or title. This will be represent the catalog online. |
| • | New Section Description – Though not required, it is suggested that you create section descriptions within your catalogs. This will provide better organization and easier navigation for the end user. You may create as many section descriptions within a catalog as you like or need. Simply select New Section Description and enter it in the Section Description field. You are given 50 characters but remember that the length of your catalog titles and section descriptions may affect the layout of the webpage. |
| • | New Items – You can now add items to your catalog. there is now need to worry about the order in which you add the items at first as you will be able to reorganize them once they’ve been added. Select New Items. |

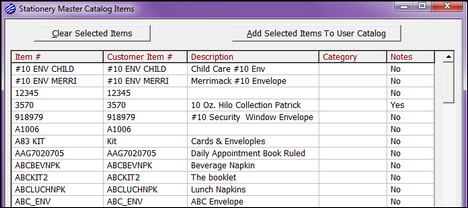
You are now presented with a list of all potential products for this product specific catalog. Just like adding items to the Master Catalog, you may choose a single item or multiple items.

| • | To select just a single product and have it immediately added to the user catalog, find the product and double-click it. |
| • | SHIFT – Holding the SHIFT key down, single-click one product and then, further down the list, single-click another. This will select the first item chosen, the second item chosen, and all items between the two. Once your items are selected, click Add Selected Items To User Catalog. |
| • | CTRL – Holding the CTRL (Control) key down, single-click multiple, individual products. This option selects only those products you single-click. Once your items are selected, click Add Selected Items To User Catalog. |
| • | If at any time you have selected incorrect items, use the Clear Selected Items option to start over. |
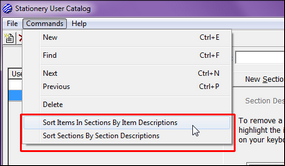
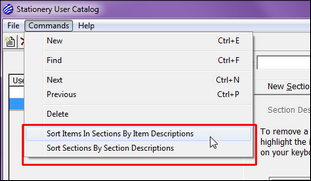
With items added to the user catalog, you can now organize them as you would like them to appear online. Simply click and drag the items or section descriptions to the desired location. You may also use the automatic sorting features found under Commands.

| • | Sort Items In Sections By Item Descriptions – Will sort all products within each section by the products’ descriptions. |
| • | Sort Sections By Section Descriptions – Will sort the sections by their descriptions. |
With your catalog now created, you can create another or simply close the User Catalog dialog.