|
Now that we have laid the foundation for this job, it’s time to begin adding line items or, in this example, the one item for which we will be requesting a quote.
| • | The New Line Item Type dialog provides options for the creation of the new, job specific line item. Each option available will be covered as you proceed through the tutorial. We will be using Item Code at this time. This option will be flagged by default so simply click OK. |
| • | Enter A1006 as the Item Code in the Item Data dialog and Tab to the next field. If we had not already known that this code represents the Click Stick Pens we are requesting a quote for, we would again be using the search option to the right of the data field. In the event this is a new item; first, use search to confirm a new record must be created and then enter a new, unique code. The system will ask if you would like to create a new item record and you would proceed to enter all new data for the product (refer to Item Records section in Order Entry I). |
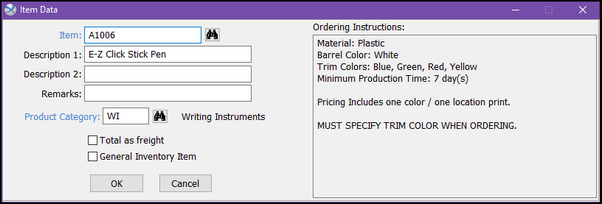
| • | Again, notice the information being pulled from the existing records. Description Lines 1 and 2 will be automatically populated though you may adjust them as necessary for this unique order. Any Ordering Instructions from the Item Record will be displayed to the right for your immediate reference. |
| • | Remarks is an optional field to use as, essentially, a third description line. There is no need for that in this example so Tab through this field. |
| • | Product Category, Total as Freight and Inventory Item have all been pulled from the original record as well and you would simply be confirming accuracy at this point. Tab through and click OK to continue. |
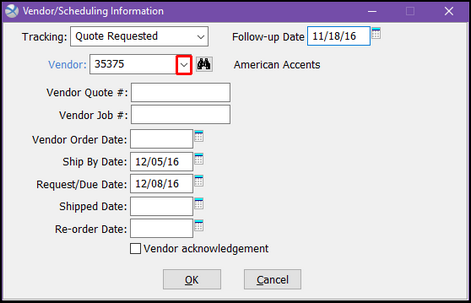
| • | Ship By Date will be used to notify the vendor of the latest possible date we expect this order to ship. For this example enter +18 and Tab. This will represent the Ship By Date as three days prior to the due date accounting for delivery time. |
| • | Request/Due Date is shown as a suggested field in Vendor/Scheduling Information and, as this will be a simple single item/single vendor job, you can Tab through accepting the original Due Date we entered for the job as a whole. |
| • | Notice the drop-down menu on the Vendor field. If you have suggested vendors listed on an Item record, they will appear in this drop-down menu to save time. Any vendors that were used on other line items on this job will also appear. If there are no suggested vendors listed on the item record, then the drop-down will only display the vendors already used on this job. If you choose a vendor that has already been used on this job, the Vendor/Scheduling Information screen will automatically populate with the same scheduling information. |
| • | Before leaving this dialog, let’s use one of the Xebra’s organization features to follow up on this product in the future. The Tracking and Follow-up Date fields will be used as reference on the main job screen and, more importantly, as criteria in producing a Reminders Report. This report serves as a “to-do list” which may include follow-up information along with other optional criteria. Using this feature increases accuracy in managing jobs and relations with customers and vendors. For more information on the Reminders Report refer to the Xebra Reporting chapter. For now, enter Quote Requested as the Tracking and +1<TAB> as the Follow-up Date. Continue by clicking OK. |
| • | As this is just a request for quote, the Line Item Quantities dialog will be used only to enter the quantity of product our customer is requesting. If the Item Record has been properly completed you will see the Unit of Measures (UOM), both sell and buy, have been carried over. All you must enter is the requested quantity. Andrew requested 1000 pens so enter 1000 for the Sell Quantity. You probably noticed the Buy Quantity was also populated as you entered the Sell Quantity. This is defaulting from the Sell Quantity we have just entered and under normal circumstances will be accurate. You can now proceed by clicking OK. |
SIDE-NOTE: NOT PART OF THE TUTORIAL
If this is an item you have ordered in the past, you can also click on the Price History button.
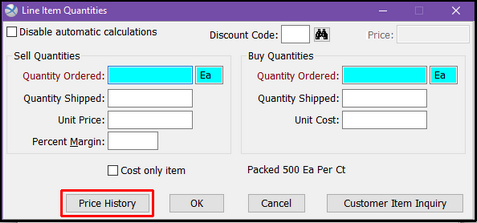
This will open the Customer - Item Pricing History screen. If you double-click on one of the entries, it will automatically fill in the quantity, cost, and price information on the Line Item Quantities screen. (NOTE: If this is the first time an order is placed for this item, the Price History button will be disabled.)
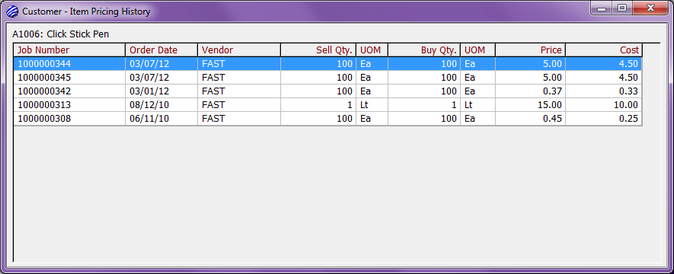
Use the X in the top right corner to close the screen and return to the Line Item Quantities screen.
END SIDE-NOTE: RETURN TO TUTORIAL
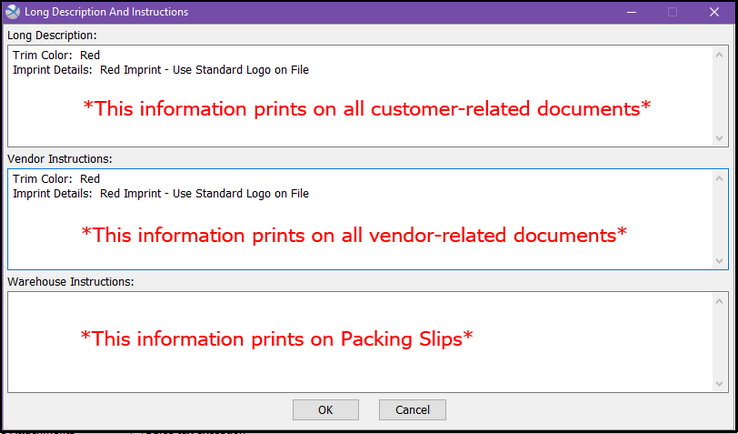
| • | You are now in the Line Item dialog. This screen represents all product information gathered from the original Item Record and the data you just entered; bringing it all together to form a unique Line Item specific to this job. While there are no suggested fields here, you may choose to utilize any of the options provided, adding more detailed information that may be required to complete this job. For now, locate and flag the Long Description and Instructions option. |
| o | This dialog should be familiar to you as it was covered under Item Records in Order Entry I. First enter the following information in Long Description and then copy and paste into Vendor Instructions as we want the information presented on both Customer and Vendor documents. |
| • | Click OK to return to the Line Item dialog. |
| • | At this time, we could also add artwork to File Attachments if needed, but it looks like we have provided our vendor with standard artwork in the past. |
|


