For Help with the basic process of creating a Purchase Order, please go to the Preparing Vendor Purchase Orders section at the end of this page.
Using the Prepare Vendor Purchase Order Screen to control the emailing of Purchase Orders
| • | Because the system no longer opens Outlook when you email a Purchase Order, several changes to the Prepare Vendor Purchase Order screen have been made to provide the flexibility you need when sending POs to a vendor. These changes allow you to: |
| o | Control the email address(es) to which the PO will be sent, |
| o | Easily attach Artwork to the email |
| o | Modify the standard text that appears in the body of the email to which the PO and Artwork are attached. |
| o | Customize your own email template for use with Purchase Orders |
| • | It is highly recommended that you review these changes before you send Purchase Orders after the update. |
Changing Email Addresses
After you select a vendor, the Prepare Vendor Purchase Order screen will display the email addresses that will be used in the area labeled Email Addresses for this Purchase Order. By default the system will email your Purchase Order to the Ordering email address and the Artwork email addresses on the Vendor Ordering Screen. You will have the option to set you own default for each vendor.
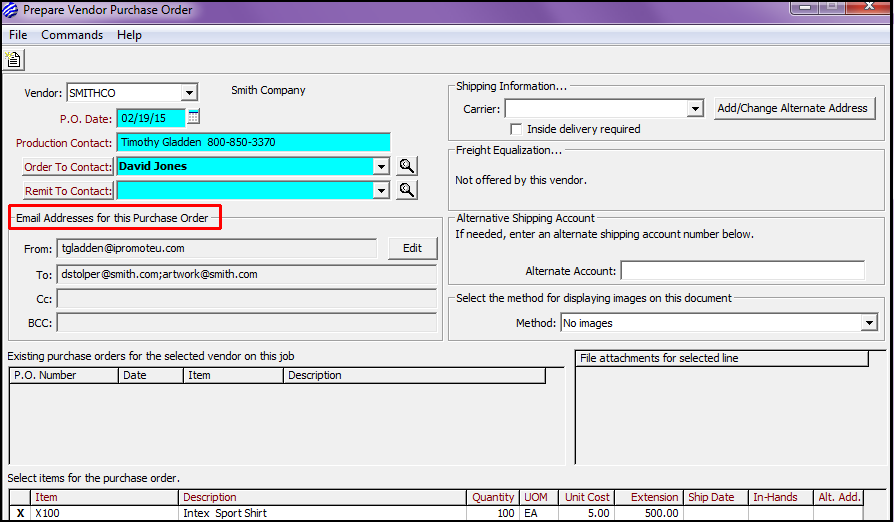
To Edit the default email address, select the Edit button.

This will open a list of all available email addresses, including those listed on Vendor Ordering Screen and the email addresses of any contacts associated with the vendor.
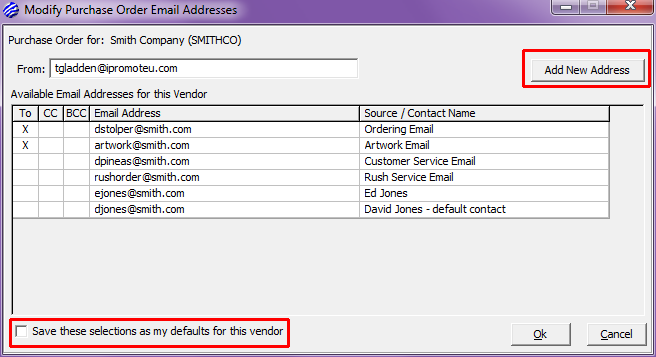
By clicking on the boxes in the columns labeled To, CC, and BCC you can choose any combination of email addresses.
If you want to add a new address, use the Add New Address box
If you want to save your selections for future use with this vendor check the box next to “Save these selections as my defaults for this vendor”
Note: A Rush Service Email field has been added to the Vendor Ordering Screen. If you want to add a Rush Service Email address for specific vendor, please contact iPROMOTEu.
Attaching Artwork
When ordering promotional products, it is usually necessary to send artwork with a Purchase Order. There are two methods for attaching artwork when you email a Purchase Order.
Attaching artwork while preparing a Purchase Order
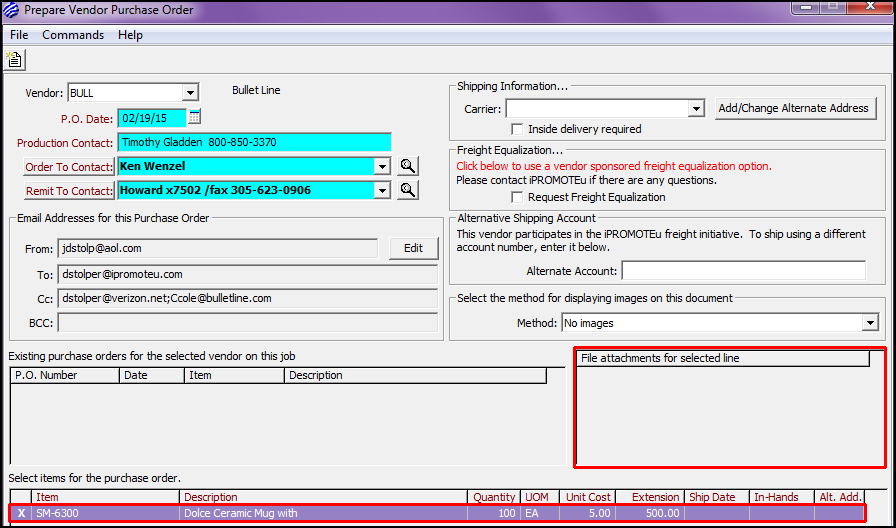
| • | Highlight the line item where the artwork file will be attached. |
| • | Browse to the location of the artwork file on your computer. |
| • | Drag the artwork file into the box under “File attachments for selected line”. |
| • | When the PO is saved the artwork will be attached the PO and also to the line item on the job. |
Attaching artwork to job in advance from the order entry screen
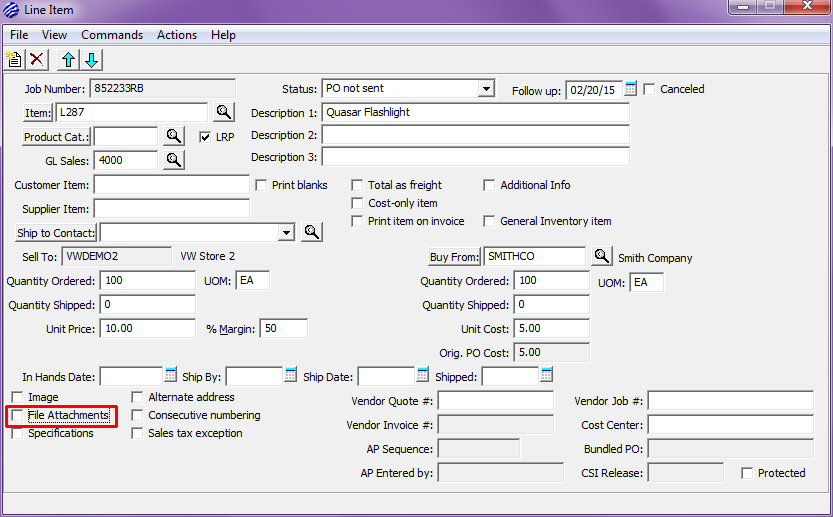
To attach artwork to a specific line item, from the Line Item Detail screen, check the box next to File Attachments
The File Attachments window will open.
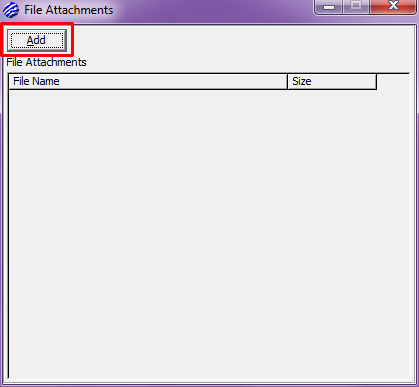
Click the Add button and browse to the location of the artwork files. Double click on the file and the File Attachment window will open.
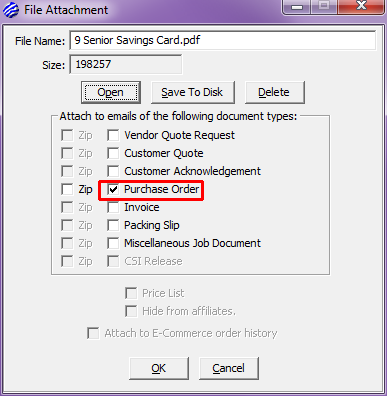
Check the box next the Purchase Order Document type. This step is necessary to cause the Artwork file to be attached when a Purchase Order is emailed.
From this screen you can also view the attachment, delete it, or save it to a new location on your own computer.
Custom Email Messages
To customize the text of the email that accompanies the Purchase Order, choose Commands>>Custom Email Message from the Prepare Vendor Purchase Order screen.
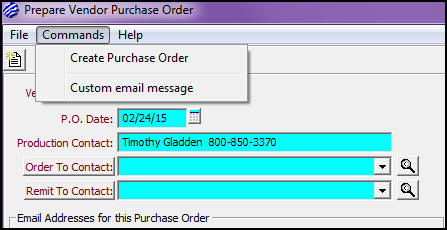
This will open the Custom Purchase Order Email screen and show your default template.
(See the next section of this document to learn how to modify your template.)
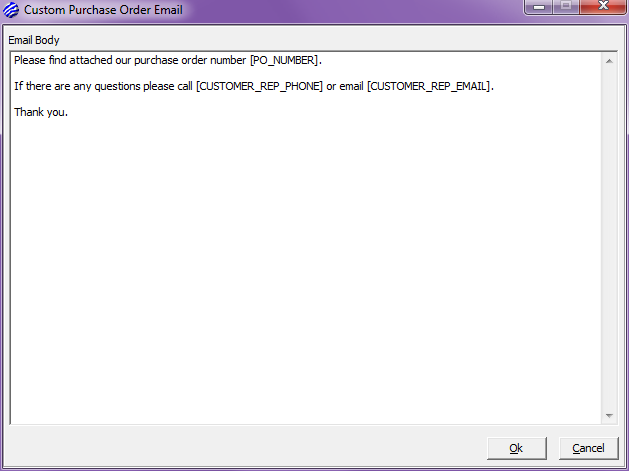
You can modify the text of the email by editing text in this window.
Click “OK” to save the modified text.
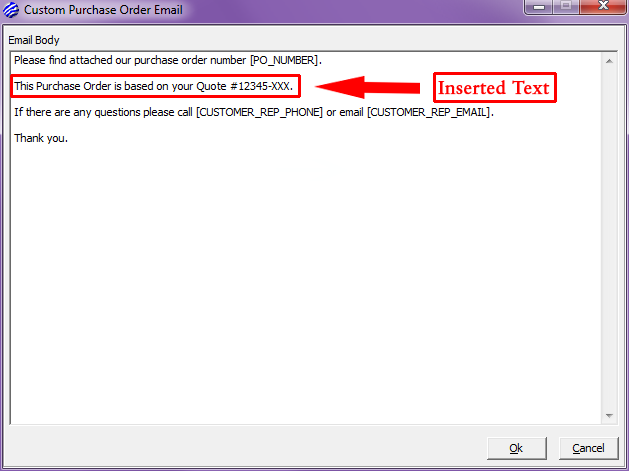
Note: This view shows the [FIELD_NAMES] in the template. The actual email will include the field values.
Purchase Order Email Templates
Xebra provides a default email template that is used to generate the email that accompanies Purchase Orders. Each affiliate has the option to modify the default template and save their own personal default.
To access the default template for Purchase Order emails, choose Go>> Setup and click on the Default Email Messages button.
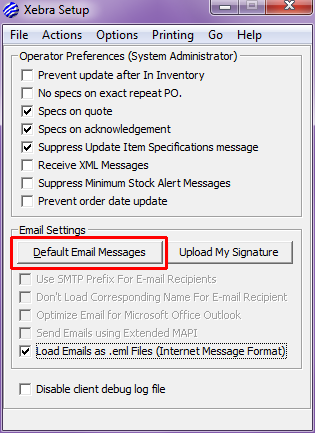
This will open the Default Email Message window
Use the Document Type drop down selection box to choose the Purchase Order document type and the template will appear.
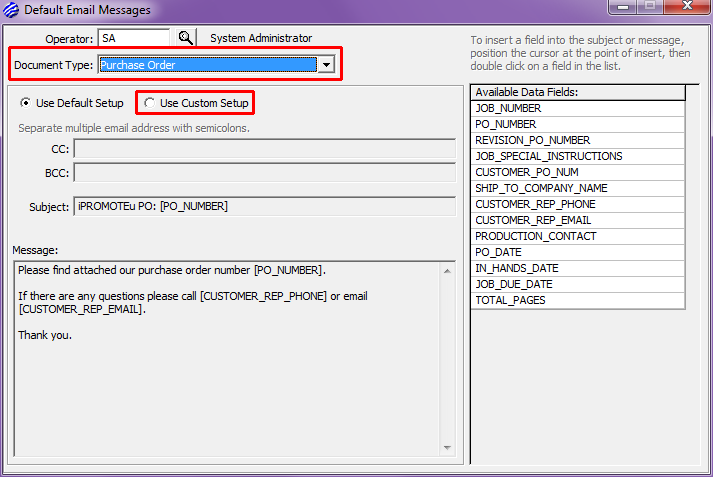
The first time you open this window the System Default Template will appear.
Click the Use Custom Template radio button to display the customizable the template and make the desired changes.
Note: This template will be used to send emails to all Vendors.
Adding a PO Sent Date when the PO is sent by fax or some other method
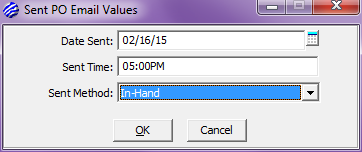
To add a sent date when the PO is submitted by fax or any method other than a system email, go to View>>Job Documents and click on Edit.
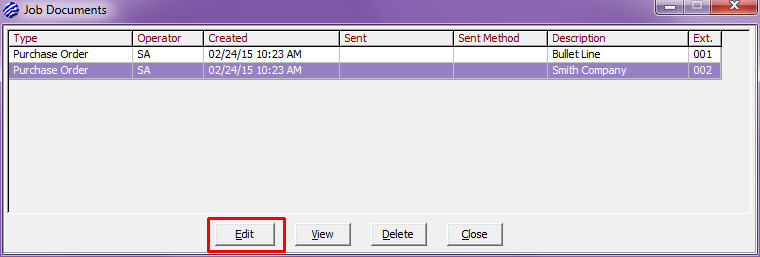
Click the Edit button, to open the Sent PO Email Values window
Preparing Vendor Purchase Orders
To prepare a Vendor Purchase Order, from Order Entry, select Actions>>Prepare Vendor Purchase Order
Select a Vendor
If there is only one Vendor, the Vendor data field and other data fields will be automatically populated. When multiple vendors are present on a job, select a vendor and hit the tab key to cause the other data fields to be populated.
Confirm Other Selections
Confirm P.O. Date (which defaults to the current date) and Production Contact (which will default to the Sales Rep on the job). While both will initially default, you may choose to alter the entries as needed. Use the Add/Change Alternate Address button to enter a different shipping address (for example, the address of a decorator) for this Purchase Order. At your option, you may modify Shipping Information, choose Freight Equalization if offered and enter an optional Shipping Account Number, and modify the setting that controls the printing of images for Purchase Order Line Items.
Selecting Line Items
The bottom section of the screen lists all line items assigned to the selected vendor that have not been included on previous purchase orders. Initially, every line item in this list box will have an “X” in the far left column, signifying that it is to be included on the purchase order we are currently creating. To exclude a line item from the purchase order, simply double-click the item and the “X” will be removed. Double-clicking the item again will restore the “X” and, once again, include the item as we create the purchase order. For reference, above the list of line items there is a list of previously created Purchase Orders for this vendor on this job.
Create and View the Purchase Order
Use Commands>>Create Purchase Order or the icon under the File menu item to open the Edit Purchase Order screen. Use the Options menu item to add Additional Instructions to the document. If you need to change other content, close this window to return to the Prepare Vendor Purchase Order screen. (To change specific line item details, you will need to return to the Order Entry Screen.)
If the Purchase Order is ready to save, use the Save icon under the Menu Bar. The finished Purchase Order will then appear in the Print Preview window. From the Print Preview window you can Save the Purchase Order as a PDF, Print it, or Email it.
Attaching A Blank Goods Receiving List to Decorator Purchase Orders
Introduction
Many iPROMOTEu Affiliates send vendors a list of the apparel items that will be shipped to them for decoration. In an effort to streamline this process, we created a Blank Goods Receiving List feature in Xebra. This system takes itemized data from blank goods Purchase Orders and merges it with an associated decorator Purchase Order. The end result provides the ability to send the decorator a consolidated Purchase Order and Receiving List.
| ◆ | Step 1: Create the Purchase Order for Blank Apparel |
Note: Step 1 is the standard recommended process for creating a Purchase Order for Blank Apparel that will be decorated. Most affiliates will already be using this process, so you won’t have to change your normal process.
When creating your Purchase Order for blank apparel, use the Add/Change Alternate Address button on the Prepare Vendor Purchase Order screen.
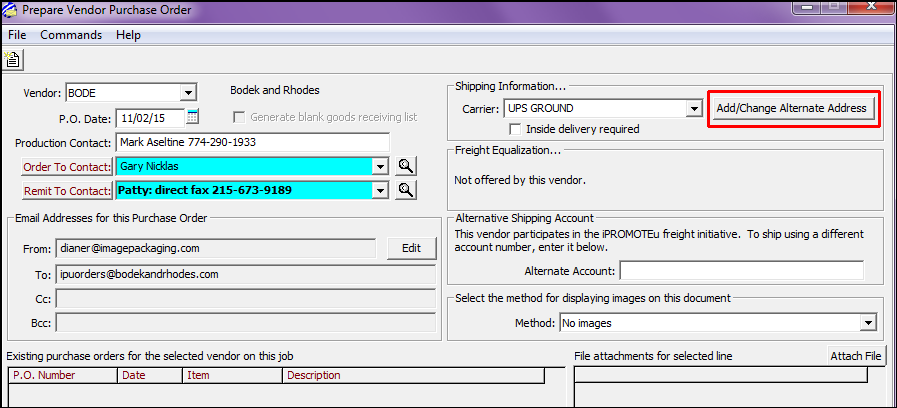
The Alternate Address dialog box will open. To add your decorator address, use the copy from Vendor button. This lets Xebra know that the blank items are going to a specific decorator. If you type the decorator address directly into the fields, Xebra will not know the Vendor Code of the decorator and you will not be able to add the Receiving List to the decorator Purchase Order.
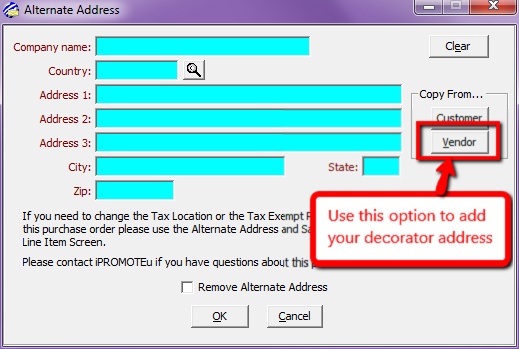
Confirm your decorator selection and click OK.
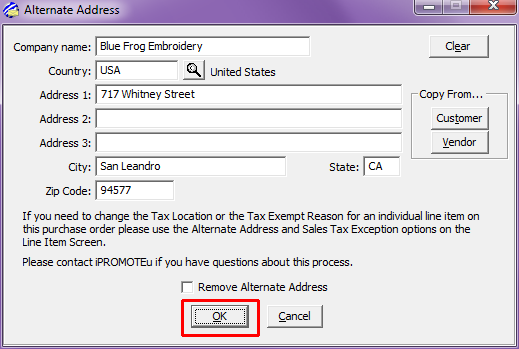
| ◆ | Step 2: Creating the Decorator Purchase Order and Blank Goods Receiving List |
When you create the Purchase Order for the decorator, the option to add a Blank Goods Receiving List will appear under the vendor name. Check the box to add the Receiving List to this Purchase Order. If the Vendor was not used as the alternate address on a Purchase Order for any blank goods on the job, the option will not be available.
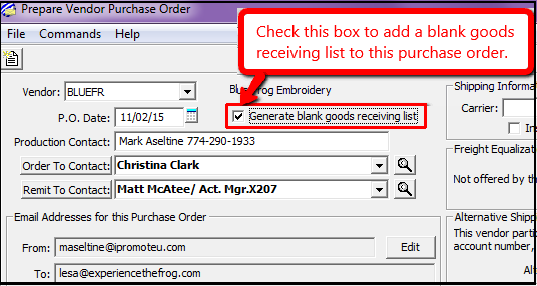
The decorator purchase order with your instructions and a packing list with vendor, item and quantity details for the blank goods will generate on separate pages.