The main record of all vendor information. Like Customer Records, Vendor Records are split into two distinct but related parts; Vendor Ordering and Vendor Remittance.
Vendor Ordering (10 characters/alphanumeric) - Record containing essential vendor ordering contact information. When necessary, multiple records may be created for vendors with multiple contacts or divisions that orders may be sorted to. Basic data this record contains include: Vendor Ordering Code, Vendor Name, Address Lines 1 and 2, City, State, Zip, Phone, Fax, Email, and the vendors www Address. Your Contact information can be entered and managed within the Contact section of the screen. Click on the Add Contact button to enter their Name, Salutation (what you would use when addressing a letter to this contact), and any other contact information (phone, fax, email, etc.) that may differ from what is on the main customer record.
In addition to this basic contact data, there are several fields providing support to order entry and accounting personnel.
Remittance Reference (required) - When initially creating a Vendor Ordering Record this field will default to the same code as the new record. When attempting to TAB through this field the Xebra will warn that “the record does not exist, would you like to create new?” If a new Vendor Remittance Record is needed, click Yes and refer to the Vendor Remittance section next to create the new record; otherwise, click No returning to the Vendor Ordering Record to choose an appropriate, existing Remittance Code. Note: Until the Vendor Ordering record is linked to a valid Vendor Remittance record, you will not be permitted to leave the screen.
| • | United Stationers Vendor - this checkbox will not be visible unless you have EDI enabled in Xebra Setup. |
| • | Pop Up Notes On Entry - Upon entering a vendor code, this option brings to the attention of the operator any information that has been entered in the Notes field. |
| • | Notes (123 characters/alphanumeric) - Used mainly to alert operators of vendor specific information. Best used in conjunction with the Pop Up Notes On Entry option. |
| • | File Attachments - You can use this to attach anything you feel is related to the Vendor Ordering record. For example, if you have a list of specially priced items, you can attach copy of the agreement here. |
Vendor Remittance (10 characters/alphanumeric) - Record containing essential vendor remittance contact information. Basic data this record contains include: Vendor Remittance Code, Company Name, Address Lines 1 and 2, City, State, Zip, Phone, Fax, and Email. Your Contact information can be entered and managed within the Contact section of the screen. Click on the Add Contact button to enter their Name, Salutation (what you would use when addressing a letter to this contact), and any other contact information (phone, fax, email, etc.) that may differ from what is on the main customer record. When creating a new remittance record from Vendor Ordering, this basic data will be automatically carried over. You can edit any of this information as you may have different contacts for ordering and remittance purposes.
Additional data found in this record will provide significant data entry efficiency, reporting capabilities and bookkeeping support.
| • | Account Number – ONLY used when the vendor has issued you a unique account number. |
| • | GL Reference - GL Chart code used for vendors that provide goods or services that are charged to a single expense category (i.e. all billing from your insurance provider may be automatically directed to an Insurance Expenses GL code). This field is not necessary for vendors who provide items that you sell. |
| • | Terms – Any terms this vendor has offered you. You may choose from the bank of Terms Codes created in Control Files. |
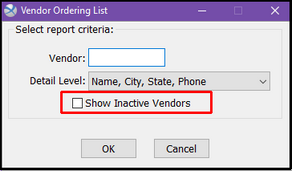
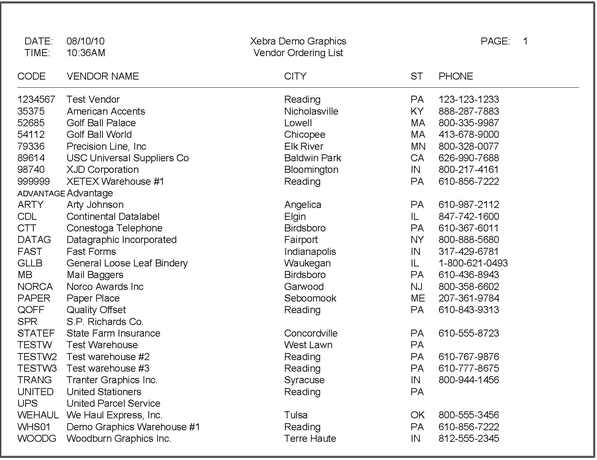
| • | Inactive - This is available on the Vendor Ordering and Vendor Remittance screens. If this checkbox is activated, the vendor will appear gray and italicized on the vendor find lists and will show under the advanced search only when the "Include Inactive Vendors" option is set. Inactive records will not show when using the Print List command unless the "Show Inactive Vendors" checkbox is checked. See the example below. |
| • | File Attachments - You can use this to attach anything you feel is related to the Vendor Remittance record. For example, if you have a pricing agreement in place with a vendor, you can attach copy of the agreement here. |
The document will open in a Print Preview screen. You can save it as a .pdf or an Excel file, print it, email it, or fax it.
To flag a vendor as a 1099 Vendor, click on the 1099 Vendor checkbox.
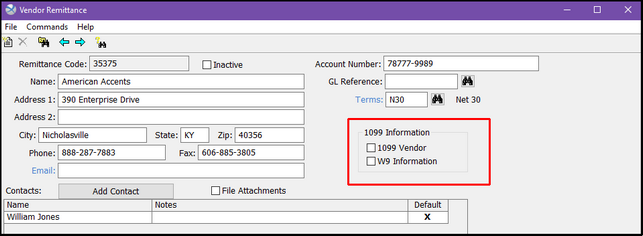
To enter W9 information for a vendor, click on the W9 Information checkbox, which will open a separate screen.
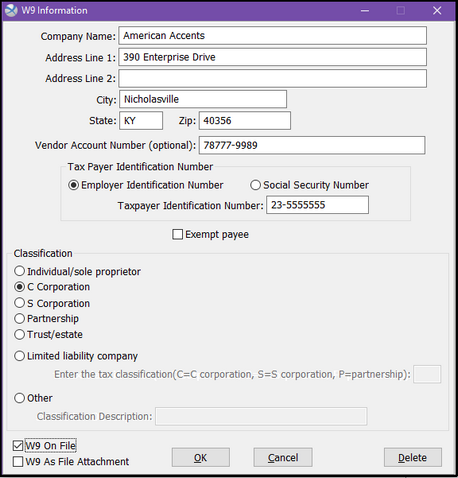
The vendor should have returned their completed W-9 form to you. You will be able to take the information directly from the form to complete the screen.
Fill in the Company Information at the top. The vendor account number field is optional. If they are a tax exempt vendor and do not require a 1099 at the end of the year, click on the Exempt payee checkbox.
The next 2 sections are required:
| • | Tax Payer Identification Number: You must choose the type (EIN or SSN), and fill in the Taxpayer ID Number. |
| • | Classification: select the classification shown on the W-9. |
Click on the "W9 On File" checkbox to indicate that you have a physical copy of the form on file in your office.
Click on the "W9 As File Attachment" checkbox to attach a copy of the W9 to the Vendor record.
Click OK.
This will bring you back to the Vendor Remittance screen.
Commands > Print W9 Info
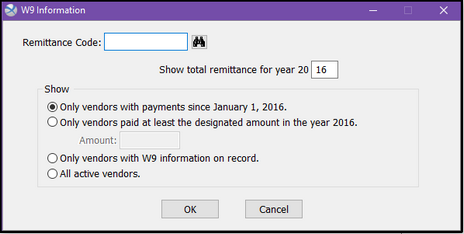
Remittance Code: Run this for a single vendor, or leave it blank for multiple vendors.
Show total remittance for year: enter the last 2 digits of the desired year.
Show: (choose 1 of the following)
| • | Only vendors with payments since January 1, 20__: whatever year you entered in the previous field is what you will see here. |
| • | Only vendors paid at least the designated amount in the year 2011/Amount: If you would like to see which vendors you've paid more than $200 so far this year, you would enter $200 in the amount field. |
| • | Only vendors with W9 information on record. |
| • | All active vendors. |
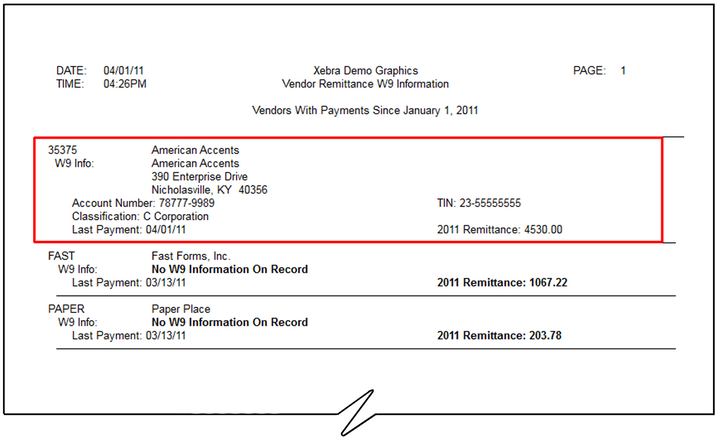
Note that just below the title of the report is a description of which Show option you selected.