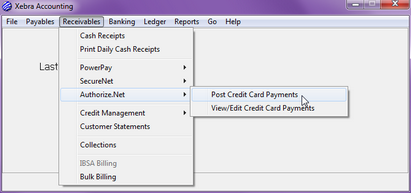
To post a series of new credit card payments, go to Accounting > Receivables > Authorize.Net > Post Credit Card Payments.
NOTE: The Accounting > Receivables > Authorize.Net > Post Credit Card Payments menu will be disabled unless you have Allow authorize privileges in your operator account.

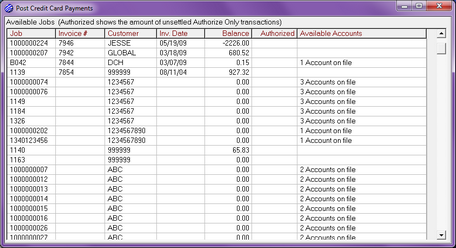
The Post Credit Card Payments window will be displayed.

The Available Jobs list will show all jobs that are open orders or invoiced. That means that prepayments can be applied to jobs as soon as the job is set to be an open order. Jobs will no longer be listed when they are paid in full or rejected.
NOTE: The Available Jobs list can be sorted by any column by clicking on the column header in the list.
To post a new payment, select a job/invoice from the list. This will open the Transaction Information dialog.

Credit Card Information
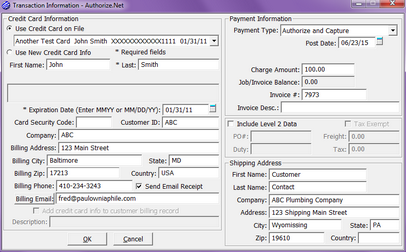
The left side of the Transaction Information dialog has all the possible information you could submit about a particular credit card.
If the Billing Customer associated with the job/invoice has stored credit card information, the Use Credit Card on File option will be checked and the first card on file will be selected by default. If there is no card information on file for the billing customer, the Use Credit Card on File option will be disabled and the Use New Credit Card Info option will be selected. In either case, you have the option to add or edit any of the information concerning the credit card.
The Card Security Code is never stored in the database. The Payment Card Industry (PCI) data security standard prohibits the storage of the card-validation code. See section 3.2.2 of the PCI standard. Visa’s Card Information Security Program (CISP) and Mastercard’s equivalent program use the PCI standard and forbid the storage of CSC codes. Storing the CSC code in any manner may result in large fines from Visa, Mastercard, and others, and is probably a violation of your merchant account agreement. If you want to use the CSC code, you will always need to enter it in the Transaction Information dialog whether or not the rest of the card information is on file. Whether you need to enter the CSC code is a complex question. It seems that almost no banks require the CSC code to process a payment. It also seems that using the CSC code will, in most cases, not lower your processing fees. We have the CSC code field available for those rare times when a card will not process without it, and to provide for a way to enter the code if you find that it does in fact lower your processing fees.
The billing address information for the cardholder is optional information that you can enter which may or may not affect your processing fees. The general rule is to enter as much information as you can to get the best rates; however, if the information you enter is incorrect, the transaction may fail or process at a higher rate. There is no way to know for sure what the processing fee will be at the time that you post a new payment.
If you want the cardholder to receive an email receipt for the payment, check the Send Email Receipt checkbox and enter the cardholder's email address in the Billing Email prompt.
If you want to store the credit card information in the associated customer billing record after the payment is processed, check the Add credit card info to customer billing record checkbox. If you store the information, you should enter a description of the card in the Description prompt so that you can identify the particular card if the billing customer ends up with more than one card on file.
NOTE: The Add credit card info to customer billing record checkbox will be disabled unless you have Allow card storage privileges in your operator account.
Payment Information
Enter information about a payment transaction in the Payment Information section of the Transaction Information dialog.
| • | There are 4 Payment Type options: |
Authorize & Capture - This is the default option if the operator posting the payment has Allow Settle security enabled in Operator Setup. With this option, payments are authorized and scheduled to settle at the same time. This means that if the payment is authorized successfully, the payment will post to your checking account without the need for any further action on your part. Actual settlement should take place on the night that you post the payment and the money should appear in your checking account within several days.
Authorize Only - This is the default option if the operator posting the payment does not have Allow Settle security enabled in Operator Setup. With this option, payments are authorized but the payments will not settle unless you explicitly settle them using an additional step. Authorizations verify definitively whether the credit card information is valid. Authorizations also check the cardholder's account to see whether they have a sufficient available balance to cover the amount of the payment. If sufficient funds are available, authorizations reserve the full amount of the payment in the cardholder's account. Once an authorization takes place, you have a limited amount of time to settle the transaction. Authorize.Net states that you have 30 days to settle an authorized transaction. Authorize Only transactions will not post cash receipts and you will not receive any money in your bank account unless you settle the transactions at a later time.
Capture a Prior Authorization- This transaction type is used to complete an Authorize Only transaction that was successfully authorized through the payment gateway within the last 30 days.
Capture Only - This option should be rarely needed. You only need to use this option if you authorize a credit card transaction outside of Xebra but you want to post the payment and settle the transaction in Xebra. You might use this payment type if you must call a bank to request a special authorization. In this case, you would get an authorization number from the bank, you would choose the Capture Only payment type, and you would enter the authorization number that you got over the phone into the Auth. # prompt.
| • | Post Date defaults to the current date on your computer. The Post Date will be the date on the payment transaction record. If the payment type is not Authorize Only, the Post Date will be the date on Xebra cash receipts and checkbook entries for the payment. |
| • | Charge Amount - This is the total amount that you will charge to your customer's credit card. This amount defaults to the remaining balance on the job/invoice that you are paying. You can change this amount to any positive value. Negative amounts will not be accepted by the Authorize.Net processing interface. |
| • | Job/Invoice Balance - This is the balance on the job/invoice that you are paying minus the Charge Amount in the prompt above it. |
| • | Invoice # - If the job that you are paying has been invoiced, this prompt will default to the invoice number. If you have Send Email Receipt checked, the email will show this Invoice number to the cardholder. |
| • | Invoice Desc. - You can enter a description of the invoice that you are paying. This description is for the benefit of your customer if they receive an email receipt from you. Some banks might also display the invoice information on your customer's credit card statement. |
| • | Include Level 2 Data - Check this checkbox if you want to attempt to have the payment qualify as a level 2 transaction. Level 2 transactions are supposed to have lower processing fees but they require more information. The data for PO# defaults from the Customer PO# on the job that you are paying. Freight defaults from the freight on the job and Tax defaults from the sales tax on the invoice if the job has been invoiced. If you aren't paying the entire job, the calculated Freight and Tax amounts will be wrong. You can adjust these values to whatever you feel is appropriate. Some credit cards do not allow level 2 processing. If the payment fails to process with the Include Level 2 Data checkbox checked, you may have to uncheck this box. It is also possible that a payment will process with the Include Level 2 Data checkbox checked, but when the payment is handled by the end bank, they will reject the level 2 status and post it as a non-qualified transaction. Again, you can never be sure how a transaction will qualify or what the processing fee will be until the payment is completely processed from your customer's credit card account to your bank account. |
| • | Shipping Address - The shipping address information is optional. It defaults from the shipping address on the job/invoice that you are paying. |
Once you click OK on the Transaction Information dialog, the information on this dialog will be transmitted to Authorize.Net for processing. If the transaction fails, you will get an error message and have the opportunity to make corrections to the information in the dialog before you try again. If the transaction successfully posts, the dialog will close, returning you to the Available Jobs list. Authorize Only transactions will put an amount in the Authorized column of this list but the balance on the jobs will not change until the transactions settle. Any transactions that are scheduled to settle immediately will adjust the balance on a job/invoice immediately. If a job is paid in full, it will be removed from the Available Jobs list.
NOTE: In Receivables > Cash Receipts, credit card transactions scheduled to settle will be listed along with any other checks that you might have received. The credit card transactions will show "Cred. Card" in the Check column of the list. Xebra will not allow you to re-distribute credit card cash receipts from the Cash Receipts window. The Daily Cash Receipts report will show one section for checks received through Cash Receipts and one section for credit card payments.