|
This includes any product that utilizes the Variable Imprint Templates. You must have a template associated with the product, otherwise it will not properly display on the site.
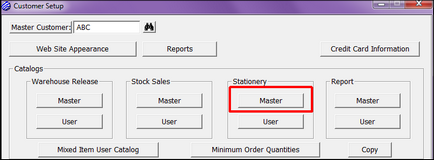
To begin adding Stationery items to the E-Commerce profile, under the Stationery section, select Master. This refers to the Master Catalog, or list of products, you wish to make available to the master customer.

You are now in the Stationery Master Catalog dialog. If you are starting a new master customer site, this list will be empty. Select New Item to add items to this list.
(NOTE: This does NOT create new item records. You are simply introducing new items to the master list.)

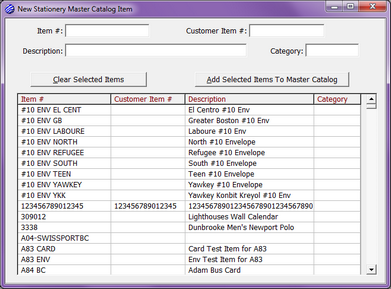
The New Stationery Master Catalog Item dialog will show you all items in your database. This includes both items that have templates already associated with them and those that do not. You will have the ability to add a template to an item after you’ve added to the master catalog, but remember, a stationery item must have a template associated with it to properly display on the site. This will not show any items that have already been chosen. There are multiple criteria available by which you can search for products to add. Placing the prompt in any of these fields will re-sort the list. Entering data into any of these fields will highlight the item closest matching the data provided.

| • | Item Number – The item number you have assigned to the product on the Item Record. |
| • | Customer Item Number – If available, this is the Customer Item number provided on the Item Record. |
| • | Description – The Description Line 1 provided on the Item Record. |
| • | Category – The Product Category assigned on the Item Record. |
There are several options in selecting items from the list.
| • | To select just a single product, double-click on it. |
| • | SHIFT – Holding the SHIFT key down, single-click one product and then, further down the list, single-click another. This will select the first item chosen, the second item chosen, and all items between the two. Once your items are selected, click Add Selected Items To Master Catalog. |
| • | CTRL – Holding the CTRL (Control) key down, single-click multiple, individual products. This option selects only those products you single-click. Once your items are selected, click Add Selected Items To Master Catalog. |
| • | If at any time you have selected incorrect items, use the Clear Selected Items option to start over. |
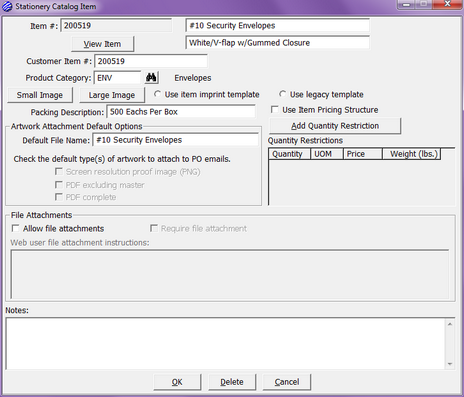
Now that you have added items to the Master Catalog, you can begin reviewing and amending these items to be represented online. From the Stationery Master Catalog dialog, double-click on one of the items you’ve just added to open the Catalog Item dialog. You’ll notice that some of the information has been carried over from the original Item Record.
Before addressing any of the data fields found on this record, notice the View Item button. This will allow you to access the main item record. The Small Image and Large Image buttons will be discussed at the end of this section.

| • | Item Number – This is the code you assigned to the item when you originally created its record. |
| • | Descriptions Line 1 and 2 – Immediately to the right of the Item Number field you will see two description lines. Again, this data is pulled from the original item record. However, you can now adjust these description lines to be unique for E-Commerce. |
| • | Customer Item Number – If available, this is the Customer Item number provided on the Item Record. This can also be changed as needed for use online. |
| • | Product Category – The Product Category assigned on the Item Record. |
| • | Use Item Imprint Template - This is for use of the new Variable Imprint Templates. The technology has been updated to allow more flexibility and options when creating a template, all of which decrease the dependency on HTML programming. The artwork generated by these templates is print-ready and can be sent directly to your vendor. |
| • | Use Legacy Template – Legacy templates predate the latest Variable Imprint technology. While you will not use this for any new templates developed, it is maintained to accommodate those that have not completed the update of all old templates. Under no circumstances should you use the Legacy Template to generate new templates. |
| • | Packing Description – This is a text representation of the complete packing information on the item record. You may adjust this information to most clearly represent the product online. |
| • | Use Item Pricing Structure – When Single-Level or Multi-Level Pricing has been entered on the main item record, you can link that information to the catalog item. If you use the Item Pricing Structure, any time the pricing is updated on the main item record, it will update the pricing in E-Commerce automatically. |
| • | Artwork Attachment Default Options – Once the end user has provided variable data and reviewed and approved the online proof, Xebra will generate several file attachments to the job. You may indicate which of these are to accompany the purchase order to the vendor. |
| ◆ | Default File Name – Here you control what the files will be named. This is only a default; you will be able to adjust the file name once it has been created. |
| ◆ | Screen Resolution Proof Image (PNG) – This is a low definition sample image of the product with provided variable data; the same image presented to the end user as the online proof. |
| ◆ | PDF Excluding Master – Used when the variable data will be printed on pre-printed masters. This PDF file will exclude all elements of the template that have been set as part of the master artwork. |
| ◆ | PDF Complete – This PDF will include a complete version of the product; including all variable data provided and any elements set as the master artwork. This is typically used when the product is printed from start to finish upon request. |
| • | Quantity Restrictions – Stationery Items provide a unique way to control sales. Quantity Restrictions allow you to set specific quantities that may be ordered and lot pricing for those quantities. You are not limited to the number of restrictions you may offer. To begin, select Add Quantity Restrictions. |
| ◆ | Quantity – The quantity being made available. |
| ◆ | UOM – The unit of measure for the quantity provided. Remember that, regardless of the UOM provided, quantity restrictions essentially force lot pricing. If you enter 50 EA at $20.00, the system will not calculate 50 x $20.00. |
| ◆ | Price – The total price for the quantity option provided. |
| ◆ | Weight (lbs.) – Provided ONLY when using the Xebra E-Commerce FedEx integration, otherwise this is left blank. When this integration is being used, the weight is required to provide accurate shipping estimates to the end user. |
| • | File Attachments – You can provide the end user the ability to upload related files when ordering a product. There is no restriction to the type or size of the file uploaded. |
| ◆ | Allow File Attachments – Indicates the end user may upload a file when ordering the product but is not required to do so. |
| ◆ | Require File Attachments – Forces the end user to upload a file when ordering the product. |
| ◆ | Web User File Attachment Instructions – Here you will want to provide any notes regarding the file attachments allowed or required when ordering the products. Among these notes, you may want to indicate the type of file expected. |
| • | Notes – Sometimes referred to as “retail narrative”, these notes give an expanded description of the product and may include material specs, sales points, manufacturer information, etc. Any information previously entered in the Long Description section of the Item Record will be pulled into this field to begin. You may delete, add to, or edit that information to best represent the product online. |
| • | Images – Though not required, a sample image of the product may be displayed online. If an image was already present on the main item record, that image was automatically copied into this E-Commerce item profile. You may want to check and potentially adjust the image for use online. There are two separate image files here. The Small Image is used as a thumbnail on the main catalog pages of the E-Commerce website. The Large Image is presented when the end user selects a specific product for more detailed review. While typically the same image is used for both, this is not necessary and you may choose to use different files in accordance with your needs. |

| ◆ | Small Image – These are limited to .JPG, .PNG, or .BMP files. Though there are no size requirements, these sample images are typically kept at about 160-200 pixels in width and height. To add or edit the small image, click the Small Image button. |
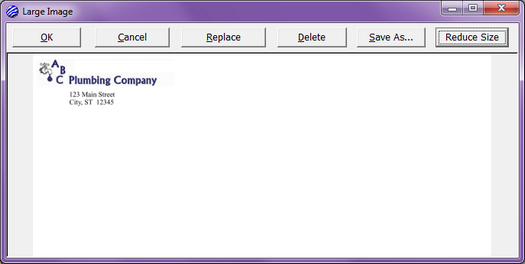
| ◆ | OK – Will exit you from the Small Image dialog, saving any changes you made. |
| ◆ | Cancel – Will exit you from the Small Image dialog WITHOUT saving any changes you made. Keep this in mind if you should make any mistakes. |
| ◆ | Add/Replace – If there is no image yet in place, you will see the Add option. Select this to open a desktop browser from which you will search and select the image you wish to use. Once an image has been chosen, Add will change to Replace and you may select this option to update the image. Again, a desktop browser will be activated so you may search and select the new image. |
| ◆ | Delete – Will delete the image currently stored. |
| ◆ | Save As – Allows you to save the current image file to your desktop. |
| ◆ | Reduce Size – Provides you the ability to adjust the size of the current image file. Xebra does an excellent job of reducing the file size but it will not increase the file size. Keep this mind before selecting images from your desktop. It is always best to start with the largest possible image of the product and reduce its size once you have loaded it into Xebra. |

| ◆ | Original – Indicates the current size of the image prior to any changes you make. |
| ◆ | Small Image – This is a system preset and will set the image to 100 pixels width. You may also choose to manually adjust the size of the image. |
| ◆ | Large Image – This is a system preset and will set the image to 300 pixels width. You may also choose to manually adjust the size of the image. |
| ◆ | Logo Image – Not typically used to control sample images, this is another system preset and will set the image to 200 pixels width. You may also choose to manually adjust the size of the image. |
| ◆ | Maintain Aspect Ratio – To ensure the image is not skewed, by default this option is check and you will rarely want to change that. This maintains the ration between height and width. |
| ◆ | Pixel Width and Height – You may manually adjust the size of your image. Remember, you can only reduce the size from the original dimensions stated above. Again, while you want the image to be easily visible online, you want to set some limit on its size as this can greatly affect browser load times. |

| ◆ | Large Image – In addition to .JPG, .PNG, and .BMP files being options, as they were with the Small Image, you may also choose to use .PDF files for your Large Image. When loading a .JPG, .PNG, or .BMP, we suggest keeping the size to approximately 600 pixels in width. This will allow the image to fill the body of the web page while not being too draining on the load time. To add or edit the large image, click the Large Image button. All options are identical to those of the Small Image listed above. |
| ◆ | Using .PDFs – PDFs are a little unique. If you wish to use a PDF as a large image, select Add/Replace. When the desktop browser opens, locate the File Name field and enter *.PDF, then press Enter on your keyboard. This will enable you to choose a PDF from your workstation files. Once you have loaded the PDF, instead of it being visible, you will see a message stating that Xebra is unable to preview the file. This is ok. Xebra may accept PDF files but it cannot display them. You will review the PDF you just loaded once the website has been updated and you may make changes at that time. |
|


