Now that you have reviewed some existing masks, let’s actually create a new mask from the beginning. To initiate this, use File > New.
For this example, let’s say we have a contract to provide business cards for a large company. We have a large quantity of blanks printed for each division of the company. The blanks are then imprinted on demand for individuals. We need to be able to send orders to the imprinter with the name of the individual, their title, extension, and email address.
Our first step is to place the title Business Card Imprinting on the mask.
Insert > Box

Notice the mouse cursor changes to crosshairs. Place the cursor on the mask grid; hold down the left mouse button and drag the box to the appropriate size and release the mouse button. The red knobs surrounding the box indicate that it is selected. Boxes can be resized by dragging any of the red knobs. To move a box, place the mouse cursor over the box and drag it to the correct location.

Once you have the box in the proper location, double-click it. The Box Properties dialog will open. This dialog allows you to set any of the properties of the box. In the Text prompt, type Business Card Imprinting then select Center for the Horizontal Alignment.
Select the Font option in the upper right-hand corner of the dialog. From the Font dialog select Arial, Bold, 10 point and select OK to close.
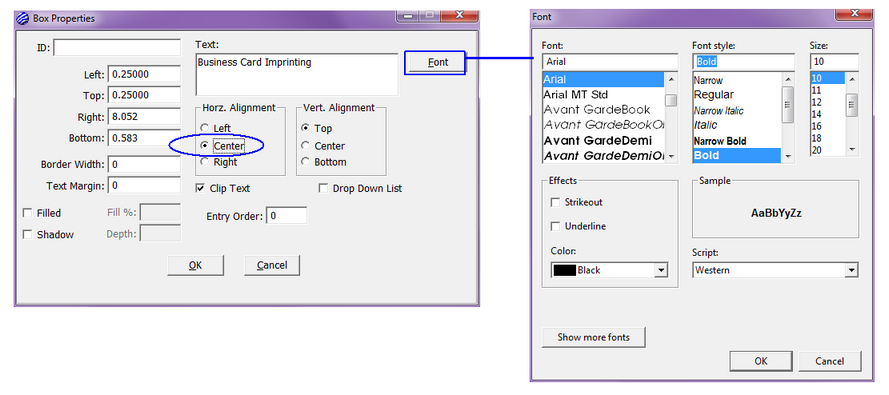
Select OK again to close the Box Properties dialog and return to the Mask Editor. You should now see the text you entered displayed in the box created.
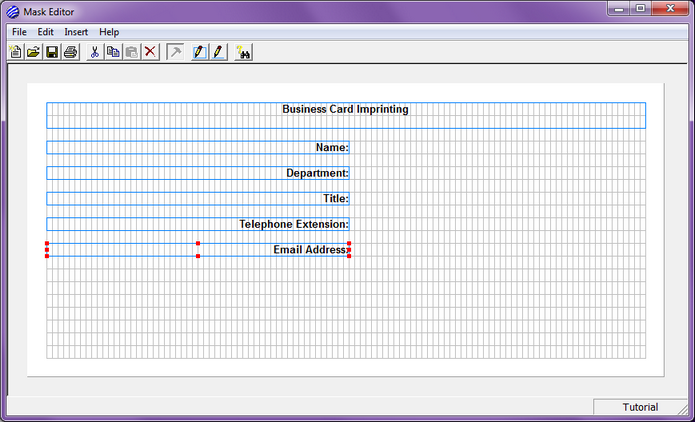
Continue to add boxes as pictured for the Name, Department, Title, Telephone Extension, and Email Address labels. The font for these boxes is also Arial, Bold, 10 point; however, you will not have to set this again as the editor uses the last font styles selected as the default for new boxes. The only change to make for these boxes will be the Horizontal Alignment. Set these label boxes with a Right alignment.
Now that we have created all the labels for the static information that must be provided, it’s time to create the open fields that will be used to enter the variable data for each unique job.
Begin by creating a new box to the right of the Name label.

If the box you have just created is not selected (surrounded by red knobs), select the box now by single-clicking it. Once selected, use CTRL + C to copy the box and the CTRL + V to paste the copy onto the mask. Drag the pasted box down until it is aligned to the right of the Department label box directly under the original. Repeat this process for the remaining labels.
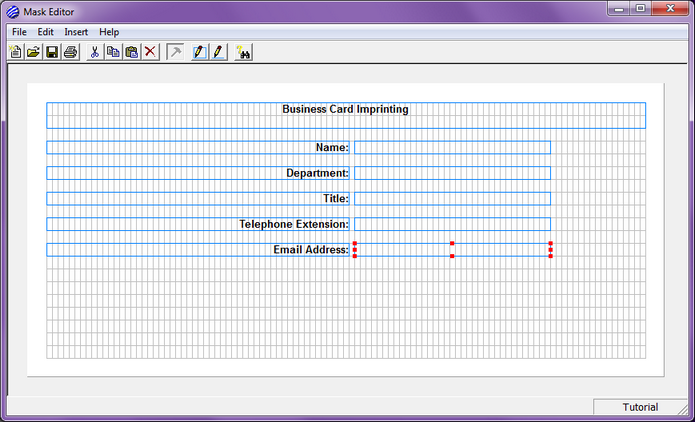
The next step is to set the font for the data entry fields. Select one of the empty boxes. Hold the CTRL key down and single-click the other empty boxes. Once all the data entry boxes have been selected, double-click one of them. The Box Properties dialog opens. Select the Font option as you did earlier and select Arial, Regular, 10 point and select OK. Now set the Horizontal Alignment to Left and select OK to return to the Mask Editor.
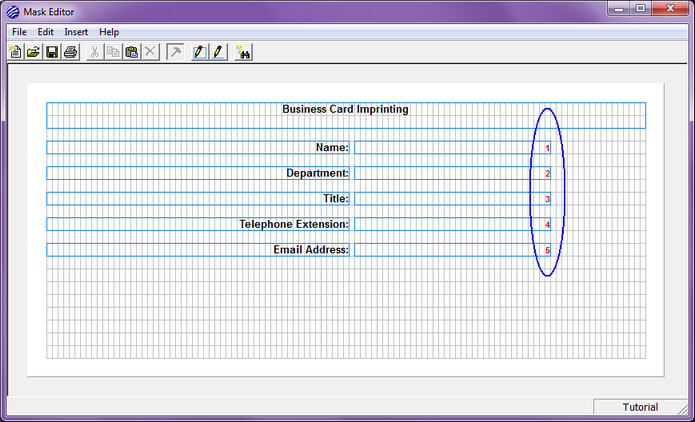
We also need to specify the tab order through the data entry fields on our mask. Click the box to the right of the Name label with the right mouse button. A small red 1 will appear in the box’s lower right-hand corner. This signifies that the user will be prompted to address this field first when completing the mask. Right click the remaining data entry field boxes in the order desired. The tab order may also be adjusted for any box from the Box Properties dialog.
The Mask Editor also provides you the option of adding drop down lists to quickly enter frequently used information. Double-click on the empty box to the right of the Department label and select the Drop Down List option. New features now appear in the Box Properties dialog. Select the Add to Drop Down List option.
Enter Sales in the text prompt and select Make Default to establish Sales as the default entry for this drop down list. Click OK to add this list option and close the dialog.
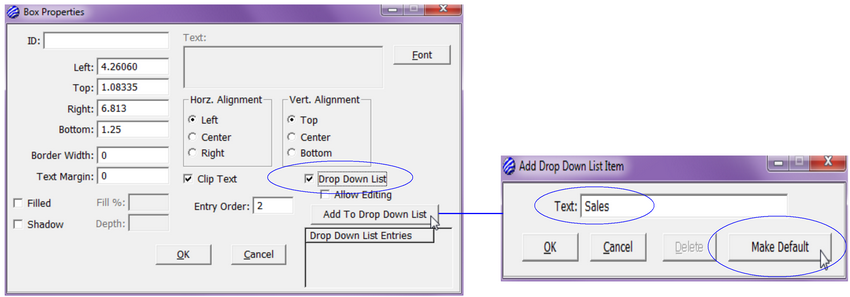
You will now see that Sales appears in the Drop Down List Entries. Select Allow Editing to allow the operator to enter anything they wish in the data entry field. Leaving this unchecked requires the operator to choose only from the options you have specified in the drop down list.
Feel free to experiment with the Drop Down List options. Add as many departments as you would like. Once finished, select OK to return to the Mask Editor. Now use File > Save to complete the mask and save it to the existing library. You will be prompted for a file name; enter Business Card Imprint.msk and select Save. You will return to the Mask Editor and can now safely exit to return to Utilities.
Navigate to the Order Entry node so that we can see the results of our work in the Mask Editor.